
Overview of Checking Account
How It Works
Entering Transactions in ACCOUNTS
See where to enter and categorize your transactions and how to split transactions too.
For a quick overview of the accounts, watch this 2-minute video.
Enter Transactions
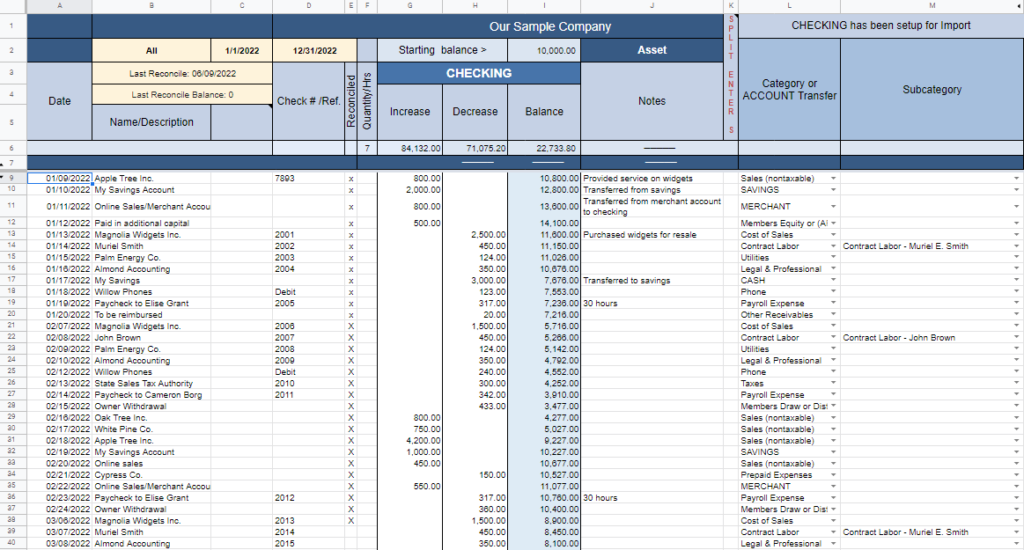
To enter transactions into the CHECKING ACCOUNT, from the Main Menu click ACCOUNTS > CHECKING to start entering your transactions.
Enter the Date First – You will enter your transactions starting on row 9 by entering a date in column A. Note: Everything in this system is date driven so if you do not enter the date first you will get a message prompting you to enter one.
Enter the Name or Description – Enter the name of who you paid or the description in column B. This is a required field.
Enter the Reference – If you are entering a check (or debit) place the check number or reference in column D.
Enter the Amount – If you are entering a check (or debit) enter the amount in column H. For a deposit or increase place the amount in column G.
Note: If you chose to import your transactions, all of the above information will have already been entered for you. You will just need to categorize them.
Also see our Troubleshooting Tips.
Categorize
To categorize, use the dropdown lists in columns L or M. Start by typing the Category or ACCOUNT then choose it from the dropdown menu. (See below)
Enter the Subcategory in column E first and the Category will populate automatically.
After one month of manually categorizing your transactions you can use the Auto Fill Categories feature found on the Import menu.
Important: Do not change anything above row 9 in any ACCOUNT, especially the Starting Balance. Starting Balances are to be entered on the Settings page only. Do NOT change the color or rename any existing tabs. To change ACCOUNT names, click Manage ACCOUNTS / Categories > Change an ACCOUNT.
Split Transactions
A split transaction is one where you write one check for more than one expense category — your credit card would be a good example. While you are in the CHECKING ACCOUNT enter the date, description, and total check amount on one row, and before using the dropdown in column L or M put a capital “S” in column K. This screen will pop up:
![]()
After completing the screen, click Submit and it will post the split transaction to your CHECKING sheet and shade the rows affected.
![]()
If you enter a split transaction incorrectly, delete the rows of the split transaction and start over on the next blank row. The dates may be out of order. To correct this, click Manage ACCOUNTS / Categories >Sort ACCOUNT by Ascending Date to place the split back where it belongs.
Journal Entries
You or your accountant can use the Journal Entries sheet to reallocate income and expenses. It is best to do this at the end of the year only or you may need to rerun reports after making these entries since your balances would have changed. Enter your debits and credits and be sure the entry totals zero.
Adding, Changing, and Deleting ACCOUNTS
See Manage ACCOUNTS / Categories.
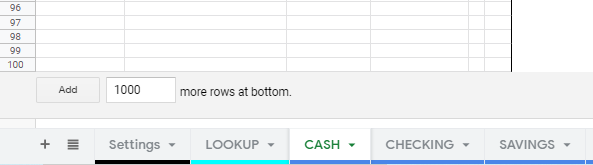
Adding More Rows
You can add rows to any sheet by scrolling down to the Add box below the last blank row. Do not use the Add default button until you change the quantity to no more than 100 rows.
Copy and Paste
You may copy and paste between columns A and M, and delete entire rows, as needed (for Windows users, it’s Ctrl C and Ctrl V).
Repair
If you are entering or copying and the sheet formatting changes, click Manage ACCOUNTS Menu > Repair Current ACCOUNT to repair the sheet back to normal.